

Tìm hiểu cách thức hoạt động của Menu trong Android

Bạn cũng có thể chỉ định một ContextMenu (menu cho ngữ cảnh) cho một View. Nó được kích hoạt thông qua hành động long-click lên View.Một context menu cho một View được đăng kí thông qua hàm registerForContextMenu(view). Hàm onCreateContextMenu() sẽ được gọi mỗi khi context menu được kích hoạt.
Menu là control rất được hay sử dụng trong Android. Có 3 loại menu đó là OptionMenu, ContextMenu và PopupMenu. Mình sẽ giới thiệu lần lượt từng loại cho các bạn. Các bạn cùng theo dõi và làm theo nhé
1. OptionMenu trong Android
1 ứng dụng có thể mở ra 1 menu để hiển thị các hành động thông qua 1 popup. Các Option menu chỉ tồn tại nếu thiết bị có hỗ trợ phím “option”. Nhưng mặc dù có sẵn phím này, Android 4.0 trở lên khuyến khích người lập trình sử dụng ActionBar thay cho menu.
Chúng ta cùng tạo 1 project demo về OptionMenu.
B1. Tạo project mới có tên MenuDemo.
Mỗi lần tạo một Android Project, nó sẽ tự tạo cho ta XML menu Resource đồng thời trong MainActivity cũng gọi sẵn hàm cho chúng ta để load Menu:
hàm load menu trong MainActivity như sau.
|
1
2
3
4
5
6
|
public class MainActivity extends ActionBarActivity {
@Override
protected void onCreate(Bundle savedInstanceState) {
super.onCreate(savedInstanceState);
setContentView(R.layout.activity_main);
}
|
// Hàm load menu mặc định khi tạo 1 Project mới.
@Override
public boolean onCreateOptionsMenu(Menu menu) {
// Inflate the menu; this adds items to the action bar if it is present.
getMenuInflater().inflate(R.menu.menu_main, menu);
return true;
}
B2. Tạo menu của riêng bạn.
Xem thêm: Địa chỉ học lâp trình android ở đâu tốt
Các bạn có thể tạo file menu của bạn bằng cách sau.
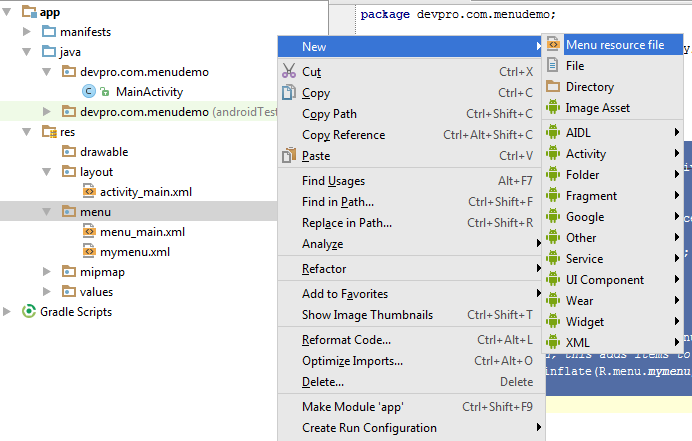
sau đó các bạn đặt tên là mymenu. Các bạn thiết kế layout đó như sau.
|
1
2
3
4
5
6
7
8
9
10
11
12
13
14
15
|
<?xml version=”1.0″ encoding=”utf-8″?>
<menu xmlns:android=”http://schemas.android.com/apk/res/android”>
<item
android:id=”@ id/mnAdd”
android:title=”Add”
android:orderInCategory=”100″ />
<item
android:id=”@ id/mnEdit”
android:title=”Edit”
android:orderInCategory=”100″ />
<item
android:id=”@ id/mnDelete”
android:title=”Delete”
android:orderInCategory=”100″ />
</menu>
|
các bạn có thể thấy menu gồm có 3 item có id và title riêng.
B3. Viết code để load menu.
Các bạn vào file main và viết code như sau.
|
1
2
3
4
5
6
7
8
9
10
11
12
13
14
15
16
17
18
19
20
21
22
23
24
25
26
27
28
29
30
31
32
33
34
35
36
37
|
package devpro.com.menudemo;
import android.support.v7.app.ActionBarActivity;
import android.os.Bundle;
import android.view.Menu;
import android.view.MenuItem;
import android.widget.Toast;
public class MainActivity extends ActionBarActivity {
@Override
protected void onCreate(Bundle savedInstanceState) {
super.onCreate(savedInstanceState);
setContentView(R.layout.activity_main);
}
@Override
public boolean onCreateOptionsMenu(Menu menu) {
// load file menu của chúng ta ở đây.
getMenuInflater().inflate(R.menu.mymenu, menu);
return true;
}
// Hàm sử lý sự kiện khi click vào mỗi item
@Override
public boolean onOptionsItemSelected(MenuItem item) {
//Lấy ra id của item vừa click
int id = item.getItemId();
//Xử lý khi click vào sẽ show ra title của item đó
if (id == R.id.mnAdd) {
Toast.makeText(getApplicationContext(),”Add clicked”, Toast.LENGTH_SHORT).show();
}
if (id == R.id.mnEdit) {
Toast.makeText(getApplicationContext(),”Edit clicked”, Toast.LENGTH_SHORT).show();
}
if (id == R.id.mnDelete) {
Toast.makeText(getApplicationContext(),”Delete clicked”, Toast.LENGTH_SHORT).show();
}
return super.onOptionsItemSelected(item);
}
}
|
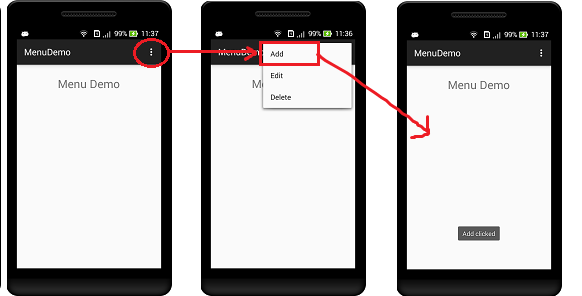
Và khi run project sẽ được kết quả như sau.
đối thiết bị thật
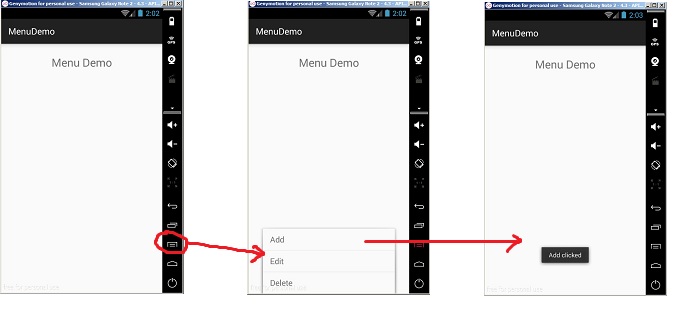
với máy ảo genymotion các bạn sẽ có kết quả như sau
 2. ContextMenu trong Android
Bạn cũng có thể chỉ định một ContextMenu (menu cho ngữ cảnh) cho một View. Nó được kích hoạt thông qua hành động long-click lên View.Một context menu cho một View được đăng kí thông qua hàm registerForContextMenu(view). Hàm onCreateContextMenu() sẽ được gọi mỗi khi context menu được kích hoạt.
Chúng ta cùng đi vào chi tiết 1 demo xem như thế nào nhé
B1. Chúng t sẽ tiếp tục sử dụng project MenuDemo ở trên. Mình sẽ thiết kế thêm 1 button là ContextMenu như sau
|
1
2
3
4
5
6
7
8
9
10
11
12
13
14
15
16
17
18
19
20
21
|
<LinearLayout xmlns:android=”http://schemas.android.com/apk/res/android”
xmlns:tools=”http://schemas.android.com/tools”
android:layout_width=”match_parent”
android:orientation=”vertical”
android:layout_height=”match_parent”
tools:context=”.MainActivity”>
<TextView
android:layout_marginTop=”25dp”
android:layout_gravity=”center”
android:textSize=”25sp”
android:text=”Menu Demo”
android:layout_width=”wrap_content”
android:layout_height=”wrap_content” />
<Button
android:id=”@ id/btnContextMenu”
android:layout_marginTop=”25dp”
android:text=”ContextMenu”
android:layout_width=”fill_parent”
android:layout_height=”50dp” />
</LinearLayout>
|
B2. Các bạn tạo thêm 1 file layout menu có tên là context_menu_layout.xml có dạng như sau.
|
1
2
3
4
5
6
7
8
9
10
11
12
13
14
15
16
17
|
<?xml version=”1.0″ encoding=”utf-8″?>
<menu xmlns:android=”http://schemas.android.com/apk/res/android”>
<item
android:id=”@ id/mnRed”
android:title=”Red”
android:orderInCategory=”100″ />
<item
android:id=”@ id/mnGreen”
android:title=”Green”
android:orderInCategory=”100″ />
<item
android:id=”@ id/mnBlue”
android:title=”Blue”
android:orderInCategory=”100″ />
</menu>
|
B3. Xử lý code để đăng ký trong mainActivity như sau.
|
1
2
3
4
5
6
7
8
9
10
11
12
13
14
15
16
17
18
19
20
21
22
23
24
25
26
27
28
29
30
31
32
33
34
35
36
37
38
39
40
41
42
43
44
45
46
47
48
49
50
51
52
53
54
55
56
57
58
59
60
61
62
63
64
65
|
package devpro.com.menudemo;
import android.app.Activity;
import android.os.Bundle;
import android.view.ContextMenu;
import android.view.Menu;
import android.view.MenuItem;
import android.view.View;
import android.widget.Button;
import android.widget.Toast;
public class MainActivity extends Activity {
Button btnContextMenu;
@Override
protected void onCreate(Bundle savedInstanceState) {
super.onCreate(savedInstanceState);
setContentView(R.layout.activity_main);
btnContextMenu = (Button) findViewById(R.id.btnContextMenu);
//Đăng ký ContextMenu cho button
registerForContextMenu(btnContextMenu);
}
//Nạp contextmenu mà chúng ta vừa tạo vào ứng dụng
@Override
public void onCreateContextMenu(ContextMenu menu, View v, ContextMenu.ContextMenuInfo menuInfo) {
super.onCreateContextMenu(menu, v, menuInfo);
getMenuInflater().inflate(R.menu.context_menu_layout, menu);
}
//Xử lý sự kiện khi click vào từng item
@Override
public boolean onContextItemSelected(MenuItem item) {
switch (item.getItemId()){
case R.id.mnRed:
Toast.makeText(getApplicationContext(),”Red clicked”, Toast.LENGTH_SHORT).show();
break;
case R.id.mnGreen:
Toast.makeText(getApplicationContext(),”Green clicked”, Toast.LENGTH_SHORT).show();
break;
case R.id.mnBlue:
Toast.makeText(getApplicationContext(),”Blue clicked”, Toast.LENGTH_SHORT).show();
break;
}
return super.onContextItemSelected(item);
}
@Override
public boolean onCreateOptionsMenu(Menu menu) {
// load file menu của chúng ta ỏ đây.
getMenuInflater().inflate(R.menu.mymenu, menu);
return true;
}
// Hàm sử lý sự kiện khi click vào mỗi item
@Override
public boolean onOptionsItemSelected(MenuItem item) {
//Lấy ra id của item vừa click
int id = item.getItemId();
//Xử lý khi click vào sẽ show ra title của item đó
if (id == R.id.mnAdd) {
Toast.makeText(getApplicationContext(),”Add clicked”, Toast.LENGTH_SHORT).show();
}
if (id == R.id.mnEdit) {
Toast.makeText(getApplicationContext(),”Edit clicked”, Toast.LENGTH_SHORT).show();
}
if (id == R.id.mnDelete) {
Toast.makeText(getApplicationContext(),”Delete clicked”, Toast.LENGTH_SHORT).show();
}
return super.onOptionsItemSelected(item);
}
}
|
các bạn chú ý các dòng sau.
– Dòng 23. câu lệnh đăng ký ContextMenu cho button
– Dòng 27: hàm onCreateContextMenu dùng để nạp Context Menu XML vào ứng dụng
– Dòng 33: hàm onContextItemSelected dùng để xử lý sự kiện.
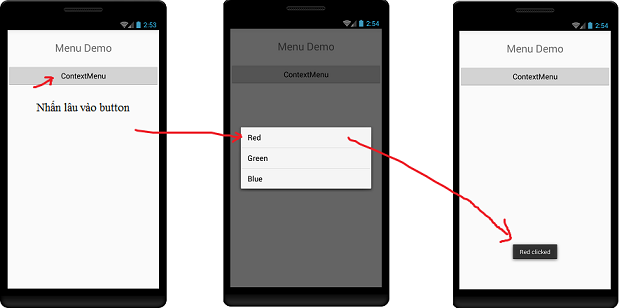
Sau khi đã hoàn thành code, các bạn chạy ứng dụng và được kết quả như sau.
3. Popup menu trong Android
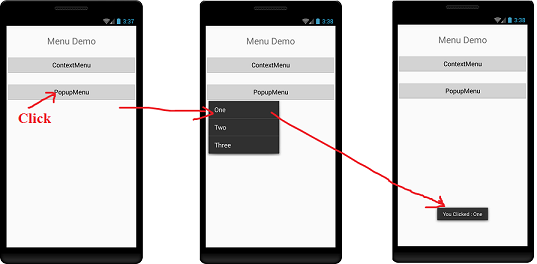
– Giới thiệu: Android Popup Menu hiển thị menu bên dưới văn bản neo nếu không gian có sẵn nếu không ở trên các văn bản neo. Nó biến mất nếu bạn nhấp vào bên ngoài popup menu. Các android.widget.PopupMenu là lớp con trực tiếp của lớp java.lang.Object.
– Xây dựng demo.
B1. Ta vẫn sử dụng project ở phần 1 và 2. Ta tạo thêm 1 button bên dưới button context
B2. Tương tự như 2 phần trên, ta tạo file layout cho popupmenu như sau.
|
1
2
3
4
5
6
7
8
9
10
11
12
13
14
15
|
<?xml version=”1.0″ encoding=”utf-8″?>
<menu xmlns:android=”http://schemas.android.com/apk/res/android”>
<item
android:id=”@ id/mnOne”
android:title=”One”
android:orderInCategory=”100″ />
<item
android:id=”@ id/mnTwo”
android:title=”Two”
android:orderInCategory=”100″ />
<item
android:id=”@ id/mnThree”
android:title=”Three”
android:orderInCategory=”100″ />
</menu>
|
B3. Ta thêm những dòng code vào hàm onCreate.
|
1
2
3
4
5
6
7
8
9
10
11
12
13
14
15
16
17
18
19
20
|
btnPopupMenu = (Button) findViewById(R.id.btnPopupMenu);
//bắt sự kiện cho button
btnPopupMenu.setOnClickListener(new View.OnClickListener() {
@Override
public void onClick(View view) {
//Khởi tạo 1 popupmenu
PopupMenu popupMenu = new PopupMenu(getApplicationContext(), btnPopupMenu);
//đẩy layout của mình vừa tạo ở trên vào ứng dụng
popupMenu.getMenuInflater().inflate(R.menu.popup_menu_layout, popupMenu.getMenu());
//Sự kiện click vào item của menu
popupMenu.setOnMenuItemClickListener(new PopupMenu.OnMenuItemClickListener() {
@Override
public boolean onMenuItemClick(MenuItem menuItem) {
Toast.makeText(MainActivity.this,”You Clicked : ” menuItem.getTitle(),Toast.LENGTH_SHORT).show();
return true;
}
});
popupMenu.show();
}
});
|
Các bạn chú ý đọc code, mình đã chú thích khá rõ ràng trong code. Sau đó các bạn run project vào xem kết quả.
Trên đây mình đã giới thiệu tổng quan về các loại menu trong Android. Bài tuy khá dài nhưng không quá khó để thực hiện. Nếu có gặp khó khăn gì trong quá trình code, các bạn có thể tham khảo khóa học từ cơ bản đến nâng cao về Android tại đây. Chúc các bạn thành công.
Cùng Danh Mục:
Liên Quan Khác


Leave a Reply